Google Play Store
Step-by-step guide for creating your Play service credentials
In order for RevenueCat's servers to communicate with Google on your behalf, you need to provide a set of service credentials. The process for configuring these credentials is a bit complex, but the added level of control improves security by providing RevenueCat with only the access we need.
It can take up to 36 hours for your Play Service Credentials to work properly with the Google Play Developer API. You may see "Invalid Play Store credentials" errors (503 or 521) and be unable to make purchases with RevenueCat until this happens.
Part 1: Generate Service Credentials
RevenueCat provides two options for generating your service credentials:
New Automated Setup Script: An automated process using Google Cloud Shell that reduces manual steps and potential errors, ideal for developers comfortable with command-line tools.
Manual Setup: The classic, step-by-step walkthrough with visual guides and screenshots, perfect for those who prefer a visual approach.
Choose the option that best suits your needs:
- 🤖 Automated Setup Script
- 📝 Manual Setup
Prerequisites
- Access to Google Play Console
- Access to Google Cloud Shell Editor
- Your Google Cloud Project ID (you can find this in the Google Cloud Console)
1. Open Google Cloud Shell
-
Go to the Google Cloud Shell Editor
-
Select your project from the dropdown at the top of the page
-
In the VS Code web editor instance, create a new file named
credentials.shin your home directory.
2. Add the Script
Copy and paste the following script into the credentials.sh file:
- Bash
#!/bin/bash

#================================================================================
#================================================================================

# This is a script to automate the setup of Google Cloud service account and credentials, required for integrating your Google Play app with RevenueCat.

# Visit https://console.cloud.google.com/, choose the project you want to use, and then click on the Cloud Shell icon in the top right corner.

# In the Cloud Console shell instance, create a new file called `credentials.sh` and paste the code below into it.

#==[IMPORTANT]== Modify the variables below to match your Google Cloud project and service account.

# After modifying the variables below, run the script by typing `bash credentials.sh` in the Cloud Console shell instance terminal. The console will output the status of the script as it runs.

# Once the script has finished running, you will need to upload the `revenuecat-key.json` file to RevenueCat in your Project Settings > Google Play App Settings > Service account credentials.

#================================================================================
#================================================================================

# Found in Google Cloud Console -> Project Overview -> Project ID
PROJECT_ID="your_google_cloud_project_id"

# The name of the service account to create. You don't need to change this.
SERVICE_ACCOUNT_NAME="revenuecat-service-account"

# The name of the key file to create in this Cloud Console shell instance. You don't need to change this.
KEY_FILE_NAME="revenuecat-key"

#================================================================================
#================================================================================

# Exit on error
set -e

# Helper functions to print styled messages
echo_info() {
  echo -e "\033[1;34m[INFO] $1\033[0m"
}
echo_success() {
  echo -e "\033[1;32m[SUCCESS] $1\033[0m"
}
echo_warning() {
  echo -e "\033[1;33m[WARNING] $1\033[0m"
}
echo_error() {
  echo -e "\033[1;31m[ERROR] $1\033[0m"
}

echo_info "🔎 Starting Google Cloud setup for RevenueCat integration..."

# Check if the PROJECT_ID has been updated
if [ "$PROJECT_ID" == "your_google_cloud_project_id" ]; then
  echo_error "🚨 PROJECT_ID is set to the default value. Please update it with your actual Google Cloud project ID."
  exit 1
fi

echo_info "Switching to project: $PROJECT_ID"
gcloud config set project $PROJECT_ID

# Enable APIs required for this automation script
echo_info "Enabling APIs needed for service account automation..."
gcloud services enable cloudresourcemanager.googleapis.com
sleep 2
gcloud services enable iam.googleapis.com
sleep 2

# Enable APIs required by RevenueCat
echo_info "Enabling RevenueCat required APIs..."
gcloud services enable androidpublisher.googleapis.com
sleep 2
gcloud services enable playdeveloperreporting.googleapis.com
sleep 2
gcloud services enable pubsub.googleapis.com

echo_success "✅ APIs enabled successfully."

# Create Service Account
echo_info "Creating service account: $SERVICE_ACCOUNT_NAME"
gcloud iam service-accounts create $SERVICE_ACCOUNT_NAME \
  --description="Service account for RevenueCat integration" \
  --display-name="RevenueCat Service Account"
echo_success "✅ Service account created successfully."

echo_info "Waiting 30s for service account to be available..."
sleep 30

# Grant Roles
echo_info "Granting roles to the service account..."
gcloud projects add-iam-policy-binding $PROJECT_ID \
  --member="serviceAccount:$SERVICE_ACCOUNT_NAME@$PROJECT_ID.iam.gserviceaccount.com" \
  --role="roles/pubsub.editor"
echo_success "✅ Pub/Sub Editor role assigned."

gcloud projects add-iam-policy-binding $PROJECT_ID \
  --member="serviceAccount:$SERVICE_ACCOUNT_NAME@$PROJECT_ID.iam.gserviceaccount.com" \
  --role="roles/monitoring.viewer"
echo_success "✅ Monitoring Viewer role assigned."

# Create Service Account Key
echo_info "Generating service account key..."
gcloud iam service-accounts keys create $KEY_FILE_NAME.json \
  --iam-account="$SERVICE_ACCOUNT_NAME@$PROJECT_ID.iam.gserviceaccount.com"
echo_success "✅ Service account key created: $KEY_FILE_NAME.json"
echo_info "Keep this key safe and upload it to RevenueCat in your Project Settings > Google Play App Settings > Service account credentials."

# Final Confirmation
echo_info "Verifying service account and key details..."
gcloud iam service-accounts list | grep $SERVICE_ACCOUNT_NAME

echo_info "Listing keys for the service account..."
gcloud iam service-accounts keys list \
  --iam-account="$SERVICE_ACCOUNT_NAME@$PROJECT_ID.iam.gserviceaccount.com"
echo_success "🎉 Setup complete! The service account is ready for RevenueCat integration. Use the file $KEY_FILE_NAME.json for your RevenueCat project, and use the service account $SERVICE_ACCOUNT_NAME@$PROJECT_ID.iam.gserviceaccount.com for permissions in Google Play Console."

exit 0
3. Modify the Script
Modify the script to set the PROJECT_ID variable to your Google Cloud Project ID as described in the script comments. You can find your Google Cloud Project ID in the Google Cloud Console.
4. Run the Script
Run the script by typing bash credentials.sh in the Cloud Console shell instance terminal. The console will output the status of the script as it runs.
The script will log a message if it encounters an error. Be aware that in some cases, manually configuring the service credentials may be necessary.
Once the script has finished running, you will need to upload the revenuecat-key.json file from the Cloud Console shell instance to RevenueCat in your Project Settings > Google Play App Settings > Service account credentials.
If you have feedback on the script and this setup process, please let us know in the dashboard Help Center.
Setup
Note that this setup takes place on both the Google Play Console and the Google Cloud Console. Due to the nature of the process, there's some switching back and forth between each console that can't be helped, but each step will make clear which console you should be looking at.
1. Enable the Google Developer and Reporting API
To enable the Developer and Reporting APIs for your Google Cloud Project, you'll want to do the following:
- Go to the API Console.
- From the projects list, select a project or create a new one.
- Go to the Google Play Android Developer API page and the Google Play Developer Reporting API page in Google Cloud Console.
- Click Enable. (This will say Manage when it is enabled.)
After enabling the API, you will be redirected to your Google Cloud API page. From there, if you do not have credentials, you will need to create these following the prompt. You'll want to select that you are using the Google Play Android Developer API. Note that you'll want to generate these with either the owner of the project or a user that has the permissions from step 3 enabled in Google Play Console.
You will then be redirected to create your form of credentials which you can follow step 2 for. If you just created your credentials, you may see the "To use this API, you may need credentials" message on your API console, this is because your credentials have not yet been validated. This will be done automatically by Google.
2. Create a Service Account
- Where: Google Cloud Console
- Cloud Console ➡️ IAM & Admin ➡️ Service Account
- You can also reach this page from the last screen used in Google Play Console. Click 'Learn how to create service accounts', then 'Google Cloud Platform' from the pop up. This will ensure that you're in the same project that you linked in Step 1 - if using the the links above or another way, double check this before creating the service account.
a. Create and name the service account key credentials and add roles.
Select the button to 'Create Service Account'. These are the credentials that RevenueCat will need to communicate with Google. Name your new account, then select 'Create and continue'.
On the step named 'Grant this service account access to project', you'll add two Roles:
- Pub/Sub Editor - this enables Platform Server Notifications
- Monitoring Viewer - this allows monitoring of the notification queue
While the Pub/Sub Editor role should be enough in most cases, some developers have reported permission errors when creating topics with that role. If you run into issues, try using the Pub/Sub Admin role instead.
Note that searching by name in the filter does not always bring up both roles. You can also find each by scrolling through the list - in the Pub/Sub and Monitoring folders respectively.
You can skip the optional third step, and select done.
b. Create and download the private key
In the 'Service Accounts' section of the Google Cloud Console, select the three dots for the Actions dropdown menu, then Manage Keys.
Select Add Key, then Create new key. On the pop up, make sure JSON is selected, and then create and download the JSON Key. We'll use this in Step 4.

If you've created your organization in Google Cloud on or after May 3rd, 2024, there may be some default constraints placed on service account creation and usage.
If you see any errors relating to organization policy constraints iam.disableServiceAccountCreation or iam.disableServiceAccountKeyCreation when creating your service account or creating your JSON key, these constraints may need to be turned off. You can do so by navigating to your project in Google Cloud Console -> "IAM & Admin" -> "Organization Policies" -> "Disable service account creation" or "Disable service account key creation".
While you're in the Google Cloud Console, get a head start on setting up Google real-time developer notifications by ensuring Google Cloud Pub/Sub is enabled for your project. You can enable it here.
Part 2: Granting Access to RevenueCat
Now that you have generated your service credentials, you need to:
- Add the service account to your app in Google Play Console, so that the credentials can be used to access details about your app.
- Upload the credentials JSON file to RevenueCat, so that RevenueCat can use the credentials for purchases.
Add the Service Account to your app in Google Play Console
-
First, invite the service account to your app in Google Play Console
In Google Play Console, go to the 'Users and Permissions' section' and select invite user.
You'll need to enter the email address of the service account you created or the one provided by the automated setup script.
-
Next, grant the service account the necessary permissions
Under App permissions you will need to add your app.
Then under Account permissions, you need to grant certain permissions in order for RevenueCat to properly work. You'll need to grant the following permissions:
- View app information and download bulk reports (read-only)
- View financial data, orders, and cancellation survey response
- Manage orders and subscriptions
All other choices are yours - the other boxes can be checked or unchecked according to your needs, as long as those three are selected.
Select invite user at the bottom of the page, and send the invite. You'll then be redirected to 'Users and Permissions', where you should see your newly created account as active.
Upload the Credentials JSON file to RevenueCat
- Where: RevenueCat Dashboard
- Project Page ➡️ Google Play App Settings
Find your credentials JSON file that was previously generated or downloaded and either drop it into your project settings or select it from the finder. Be sure to save changes. Within approximately 36 hours, your credentials will be activated and we'll be ready to handle Google Play purchases!
There is a workaround to get this validated sooner. In Google Play Console, open your app's dashboard and visit the 'Monetize' section. Go to Products -> Subscriptions/in-app products, and change the description of any product and save the changes. This should work to enable the new service credentials right away (or very shortly) and you can revert the changes to that product. It's not guaranteed to work, but has worked for others in the past to get things working right away. Otherwise, it usually starts working within 24 hours but possibly more than 36.
While you're in your RevenueCat Play Store App settings and waiting for your credentials to activate, set up your Google Real-Time Developer Notifications. If you enabled Pub/Sub in Step 2 of this doc, skip ahead to step 2 of the setup.
Part 3: Upload your signed APK or Android App Bundle
- Where: Google Play Console
In order to start making purchases, you need to upload your signed APK or Android App Bundle to Google Play Console. You can read more about the process in our Google Play Store sandbox testing guide documentation.
Part 4: Check the status of your credentials
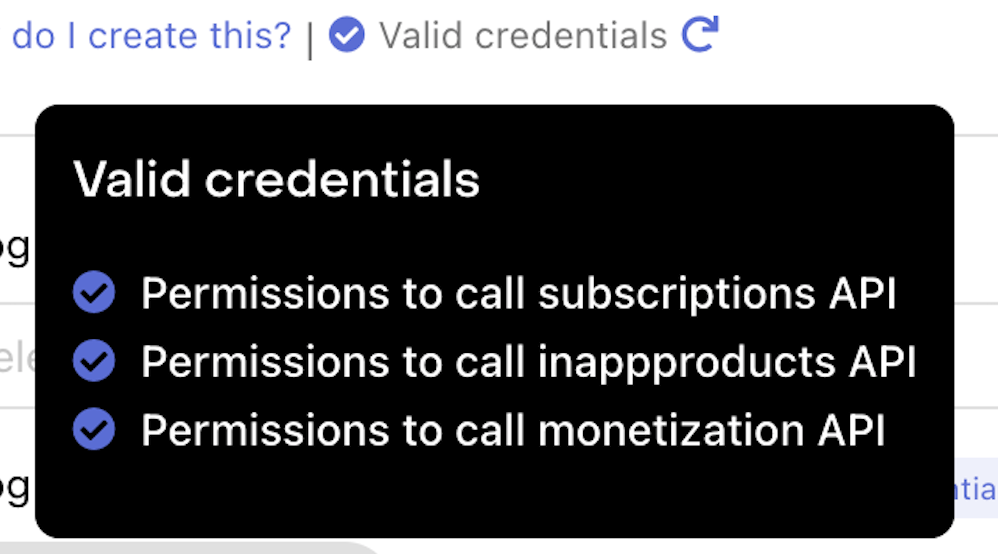
With our Google Play credential validation, we will validate every time Google credentials are (re)uploaded or at any time through a click of a button.

A summary message will appear with the results of the validation to provide you additional information about the status of your Google credentials. Once your credentials are valid, you will see a "Valid credentials" message under your uploaded JSON file with all permissions checked.
➡️ Keep in mind that it can take up to 36 hours for your credentials to be validated.
Troubleshooting
This guide contains a lot of information and many steps, and it can be all too easy to move too quickly or simply misconfigure something. To help troubleshoot your credentials, you should confirm the following:
1. Confirm checklist
Let's break down each step by where it needs to take place as you're going through the guide or after the fact with our handy Checklist. Going through this checklist will ensure you've hit each step in your configuration.
2. Credentials are enabled
When creating your service account for the first time, the account is enabled by default. However, Google may automatically disable your service account if it detects that the credentials were leaked, or the account might have accidentally been disabled in the Google Cloud console.
To confirm that the service account is enabled, navigate to your Google Cloud console to check that the entry for your RevenueCat service account shows "Enabled".
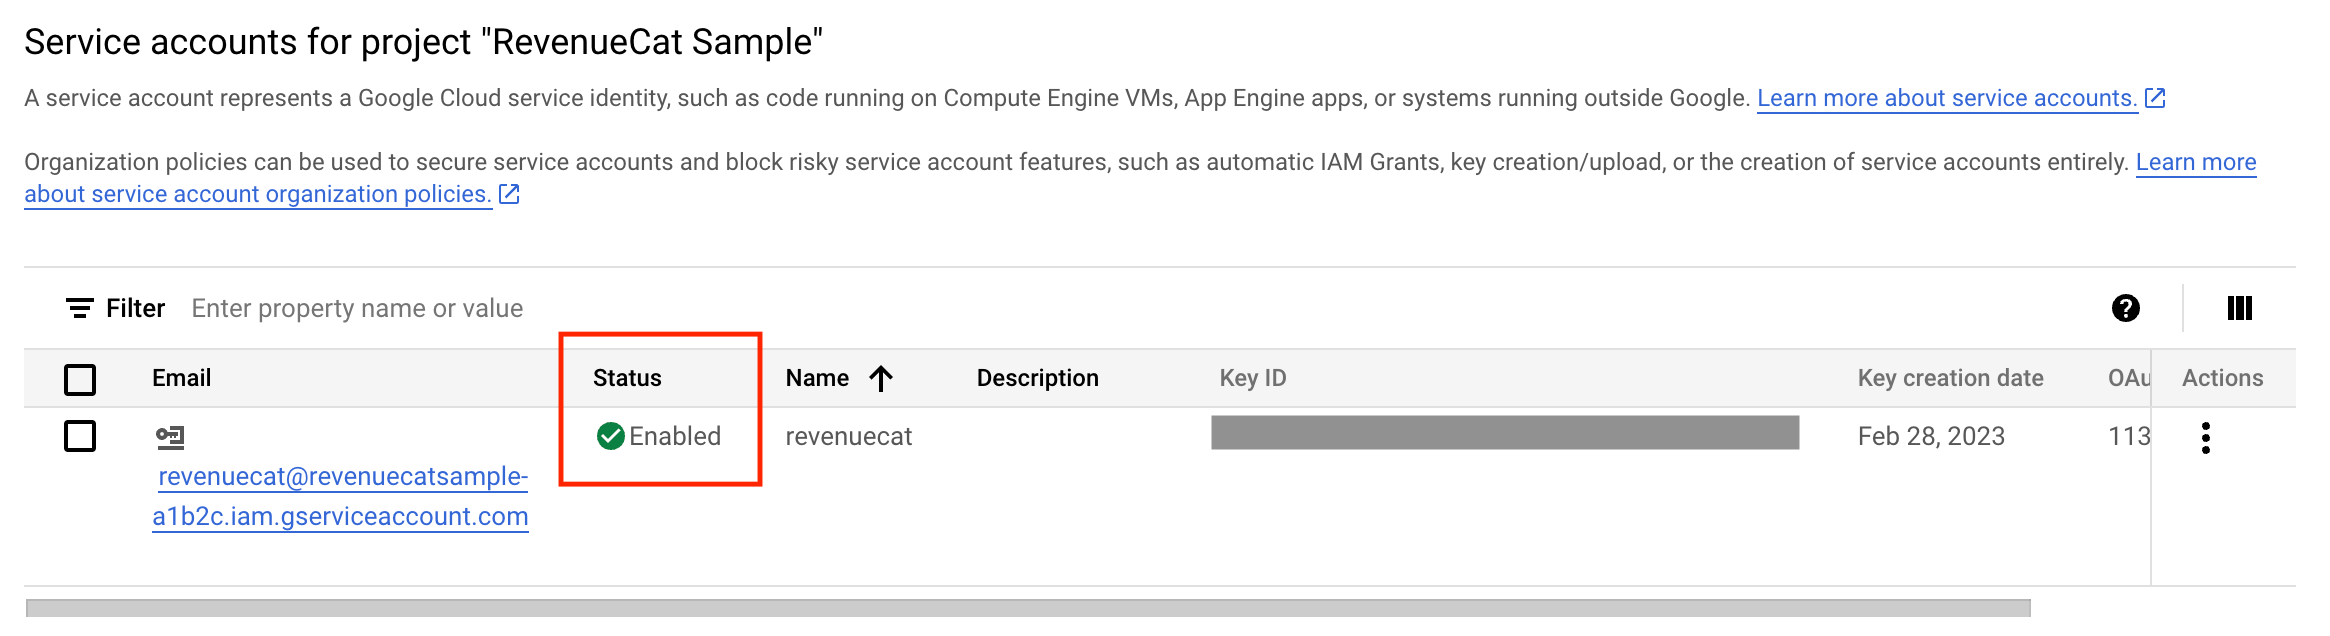
If the account shows as disabled, we do not recommend re-enabling your credentials due to security risks. Instead, we recommend generating new credentials following the instructions outlined in this documentation.
3. The JSON file uploaded to RevenueCat is the correct file
You should confirm that the JSON file uploaded to RevenueCat is the correct file. To double check which file was uploaded, you can select the info icon and check your service account's 'Project ID', 'Private Key ID', and 'Client Email'.

4. Re-upload the credentials into RevenueCat
Whenever credentials are not working properly, we recommend re-uploading your credentials. This will help rule out if the incorrect JSON file was uploaded to RevenueCat by you or your collaborator(s).
Credential validator troubleshooting
Once you've confirmed your credentials are enabled and the correct JSON file as been uploaded into RevenueCat, let's dive deeper into the credential validator's summary message.
| Permissions: | Why it's not passing: | What to do: |
|---|---|---|
| subscriptions API | We were unable to use your credentials to receive a response from Google's GET subscriptions endpoint. | Ensure that you have granted the following permissions: Once this is done, try to make a test purchase using a Sandbox user in order to check if the connection to the subscriptions API is working. You will also want to make sure that you have uploaded your signed APK or Android App Bundle and have completed all the steps to approve the release. |
| inappproducts API | We were unable to use your credentials to receive a response from Google's GET inappproducts endpoint. | Ensure that you have granted the following permission:
|
| monetization API | We were unable to use your credentials to receive a response from Google's LIST monetization endpoint. | Ensure that you have granted the following permission:
|
After making changes to your Google credentials, it may take 24 hours, up to 36 hours, for the changes to populate throughout Google's servers. For a potential workaround that could help get your credentials validated faster, see the info note under step 2.
Error Handling
Below are the most commonly occurring errors when setting up your service credentials or developer notifications and what you should to do when you see them.
Dashboard errors
| Error message: | What to do: |
|---|---|
| 'Your Google Service Account credentials do not have permissions to access the needed Google resources. Refer to this guide for more information.' | Confirm that the roles granted to your service account in Google Cloud match: Pub/Sub Editor (or Admin) and Monitoring Viewer. If you change them or update them at all, make sure that you re-generate your JSON key to add to RevenueCat. |
| 'The provided Google Service Account credentials JSON is invalid.' | Re-generate the JSON key from Google Cloud and try uploading it to RevenueCat again. If you get the same error, try re-creating your service account. |
| 'Google Play service account credentials must be set up before using this feature.' | This one is most likely to crop up if trying to perform an action that communicates with Google, such as importing products for Android, before setting up service credentials. |
| 'Account permissions are invalid for this request.' | Not all RevenueCat collaborators have the same permissions. In order to make changes to an app's configuration (such as creating service credentials), a user must be listed as an 'Admin'. |
| 'Google Cloud Pub/Sub API must first be enabled. Enable it by visiting your Google Cloud Platform console' | Enable access to the Pub/Sub API on the Google Cloud Console for the same project that you used to set up your service credentials. |
| 'Your Google service account credentials do not have permissions to access the Google Cloud Pub/Sub API. Refer to this guide for more information.' | This points to either the Pub/ Sub API access not being enabled, or the Pub/Sub role that has been added to the service account is not the admin role. Double check that your service account has the correct roles, and if changing them, re-generate the JSON key and re-add it to RevenueCat. |
SDK error
| Error: | Underlying message: | What to do: |
|---|---|---|
InvalidCredentialsError | 'Invalid Play Store credentials.' | Unfortunately, this one is a little vague. Run through the guide again, ensuring that all steps have been followed. If you've already waited for over 36 hours and continue to get this error, try starting over from the beginning. |